The Importance of Encryption for Data Protection: VeraCrypt


In today's digital world, personal and sensitive data is continuously being created, stored, and transmitted across networks. Whether to protect banking information, business files, or personal communications, data can be easily exposed to threats if not properly protected. This is where encryption comes into play – an essential tool to ensure the security of your digital life. Understanding how to encrypt your data and using tools like VeraCrypt can significantly reduce the risk of data breaches and unauthorized access.
Why Encryption is Important
Encryption is the process of converting readable data (plaintext) into an unreadable format (ciphertext), ensuring that only authorized parties can access this information. By encrypting your data, even if hackers manage to steal it, they won't be able to understand or use the information without the decryption key.
Encryption is essential for:
1. Protecting Sensitive Information: Whether you are a business owner or an individual, sensitive information, such as financial records, passwords, and health data, needs to be protected against cybercriminals.
2. Ensuring Data Privacy: Encryption helps ensure that your communications and data remain confidential, protecting your privacy from unauthorized access or surveillance.
3. Regulatory Compliance: Many industries are legally required to protect certain types of data. Encryption helps meet these regulatory standards, ensuring that data is stored and transmitted securely.
4. Preventing Identity Theft: By encrypting sensitive data, such as personal identification numbers (PINs) and passwords, you reduce the risk of identity theft.
Now, let's look at two practical tools that allow you to apply encryption to your files: VeraCrypt and Cryptomator.
How VeraCrypt Protects Your Data
Imagine that you use an external drive for your business, storing client data, financial records, or personal files. If you lose the drive or it gets stolen, the information contained in it can be easily exposed. By using VeraCrypt to encrypt the entire drive, you can prevent unauthorized users from accessing any of your data.
VeraCrypt is a free and open-source disk encryption tool that allows you to create encrypted containers where you can store sensitive files. These containers work as virtual disks on your computer, and when mounted with the correct password or encryption key, they become accessible like any other disk. When unmounted, they become inaccessible encrypted files.
Practical Example: Protecting Your External Hard Drive with VeraCrypt
Imagine you have an external hard drive with backups of all your important documents, family photos, and work files. Losing that hard drive would be disastrous if someone could access the contents. With VeraCrypt, you can encrypt the entire hard drive, ensuring that even if it falls into the wrong hands, no one will be able to access the data without the decryption password.
Here is how you can use VeraCrypt:
1. Download and install VeraCrypt here.
When you run VeraCrypt, the following screen will appear:
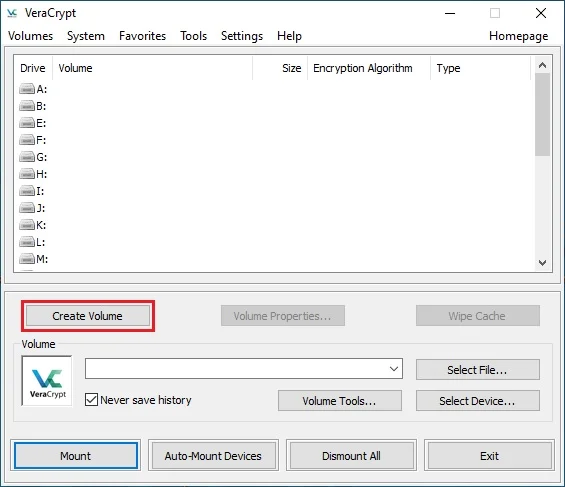
2. Click on Create Volume (marked with a red rectangle for clarity):
The VeraCrypt Volume Creation Wizard window should appear:
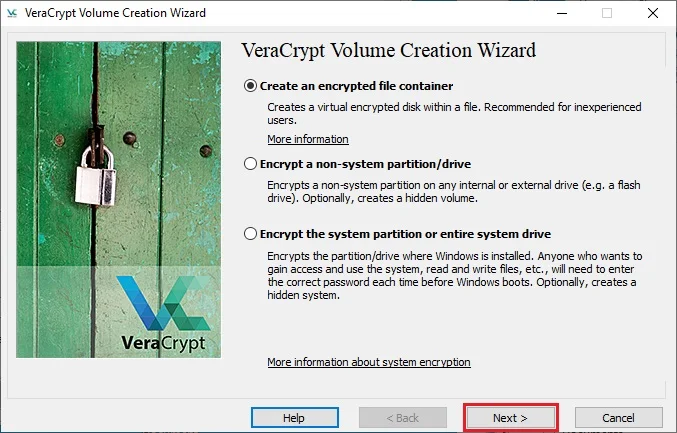
At this step, you need to choose where you want the VeraCrypt volume to be created. A VeraCrypt volume can be in a file, also called a container, in a partition, or in a drive. In this tutorial, we will choose the first option and create a VeraCrypt volume inside a file.
As this option is already selected by default, you can simply click on Next.
Note: In the following steps, the screenshots will only show the right side of the wizard window.
3. Choose the Volume type:
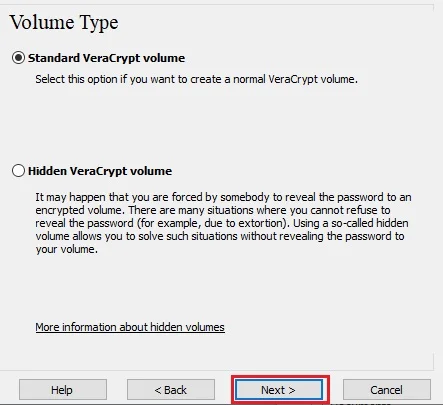
At this step, you need to choose whether you want to create a standard or hidden VeraCrypt volume. In this tutorial, we will choose the first option and create a standard VeraCrypt volume.
As this option is already selected by default, you can simply click on Next.
4. Choose the Volume Location:
At this step, you must specify where you want the VeraCrypt volume (container file) to be created. Note that a VeraCrypt container is like any normal file. It can, for example, be moved or deleted like any other common file. You also need to assign a name to the file, which you will choose in the next step.
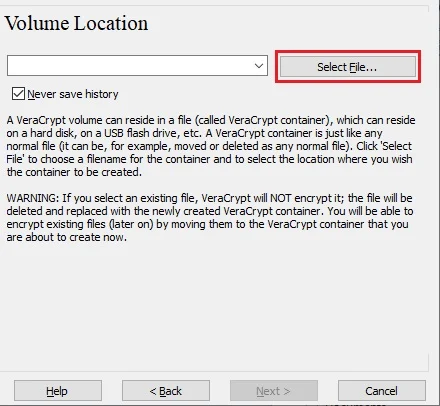
Click on Select File.
The standard Operating System file picker should appear (while the VeraCrypt Volume Creation Wizard window remains open in the background).
IMPORTANT: Note that VeraCrypt will not encrypt existing files (when creating a VeraCrypt file container). If you select an existing file at this step, it will be overwritten and replaced by the newly created volume (that is, the overwritten file will be lost, not encrypted). You will be able to encrypt existing files later by moving them into the VeraCrypt volume we are creating now.
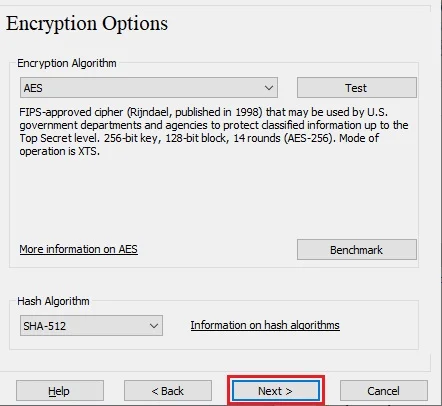
5. Choose the encryption type:
Here you can choose an encryption algorithm and a hash algorithm for the volume. If you are not sure about what to select here, you can use the default settings and click on Next (for more information, see the chapters on Encryption Algorithms and Hash Algorithms).
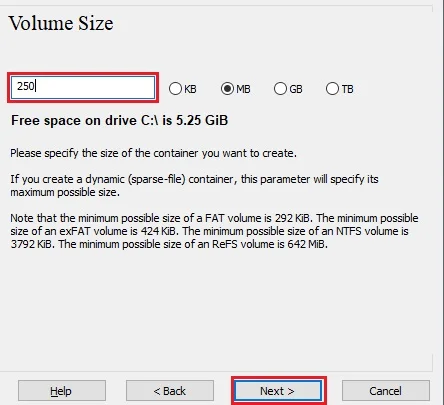
6. Choose the Volume Size
Here, we specify that we want our VeraCrypt container size to be 250 megabytes. You can, of course, set a different size. After entering the desired size in the input field (marked with a red rectangle), click Next.
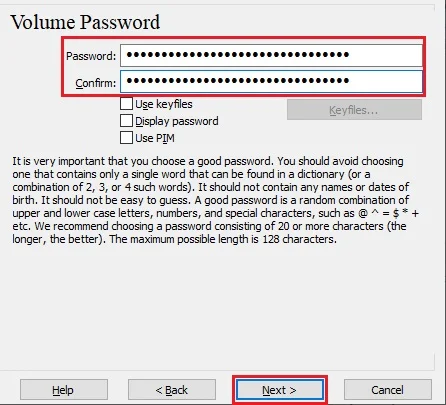
7. Enter Your Password
This is one of the most important steps. Here, you should choose a good password for the volume. Carefully read the information displayed in the wizard window about what is considered a good password.
After choosing a strong password, type it in the first input field. Then, retype it in the input field below the first one and click Next.
8. Format the Volume
Move the mouse randomly within the Volume Creation Wizard window until the randomness indicator turns green. The longer you move the mouse, the better (it is recommended to move it for at least 30 seconds). This significantly increases the cryptographic strength of the encryption keys (which enhances security).
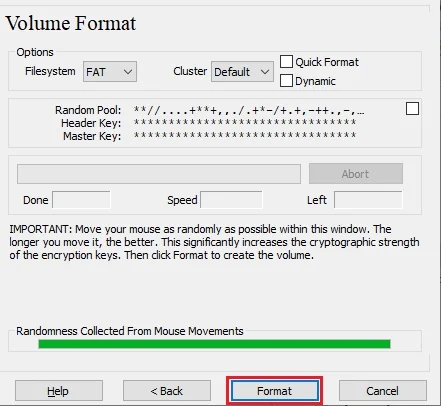
Click Format.
Volume creation should begin. VeraCrypt will now create a file called MyVolume.hc in the folder as specified in Step 4. This file will be a VeraCrypt container (which will contain the VeraCrypt encrypted volume). Depending on the volume size, volume creation may take some time. Upon completion, the following dialog box will appear:
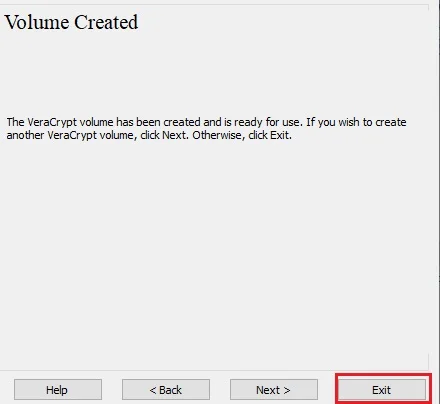
With VeraCrypt, your external hard drive is now protected by robust encryption, ensuring that your sensitive data remains secure.
9. Mount the Volume
In the following steps, we will mount the volume we just created. We will return to the VeraCrypt main window.
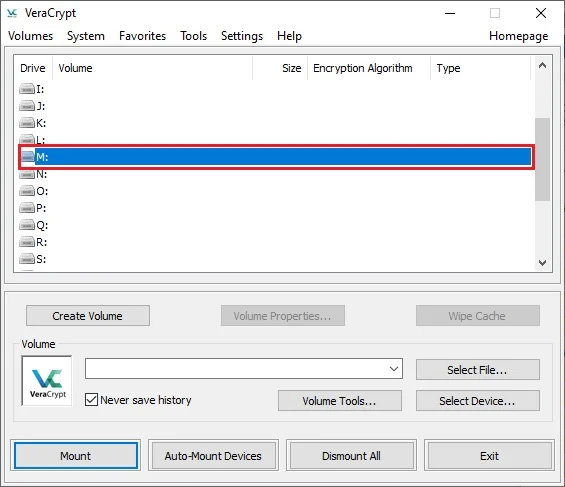
Select a drive letter from the list (marked with a red rectangle). This will be the drive letter on which the VeraCrypt container will be mounted.
Note: In this tutorial, we chose drive letter M, but you can, of course, choose any other available drive letter.
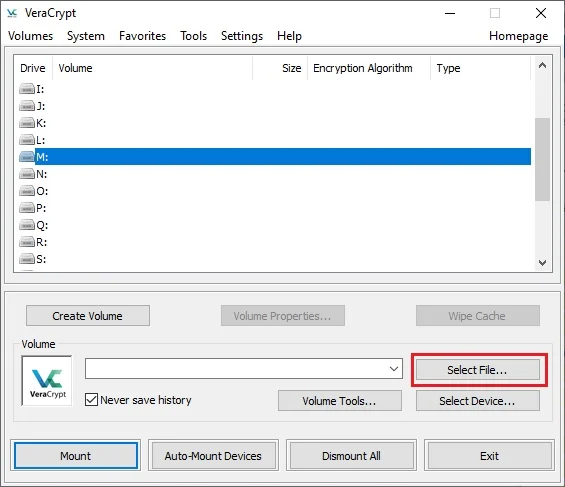
Click Select File, and select the container file created earlier.
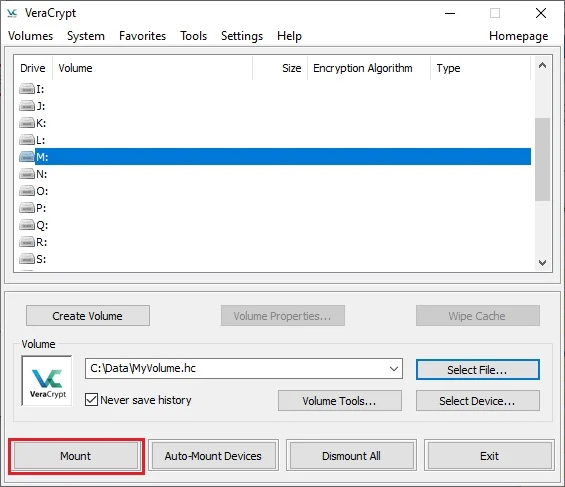
Then click Mount:
Enter the volume password you chose in step 7:
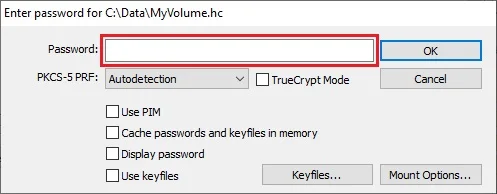
VeraCrypt will now attempt to mount the volume. If the password is incorrect (for example, if you typed it incorrectly), VeraCrypt will notify you, and you will need to repeat the previous step (enter the password again and click OK). If the password is correct, the volume will be mounted.
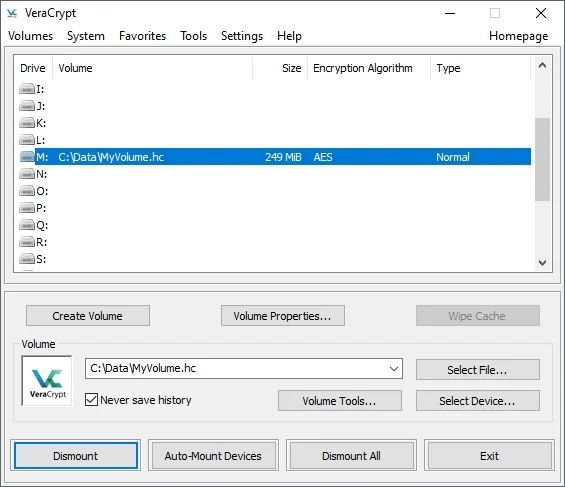
The virtual disk created with VeraCrypt is fully encrypted (including file names, allocation tables, free space, etc.) and behaves like a real disk. You can save (or copy, move, etc.) files to this virtual disk, and they will be encrypted instantly as they are written.
If you open a file stored in a VeraCrypt volume, for example, in a media player, the file will be automatically decrypted in memory (RAM) while it is being read.
Important: Note that when opening a file stored in a VeraCrypt volume (or when writing/copying a file from/to the VeraCrypt volume), you will not be prompted to enter the password again. You only need to enter the correct password when mounting the volume.
You can open the mounted volume, for example, by selecting it in the list, as shown in the previous screenshot (selection in blue), and then double-clicking on the selected item.
It is also possible to access the mounted volume the same way you access other types of volumes. For example, by opening the "Computer" (or "My Computer") list and double-clicking on the corresponding drive letter (in this case, the letter is M).
You can copy files (or folders) to and from the VeraCrypt volume the same way you would with any normal disk (for example, through simple drag and drop operations). Files that are being read or copied from a VeraCrypt encrypted volume are automatically decrypted in real time in memory (RAM). Similarly, files that are being written or copied to the VeraCrypt volume are automatically encrypted in real time in RAM, right before they are written to disk.
Note that VeraCrypt never saves decrypted data to disk – it is stored temporarily only in RAM. Even when the volume is mounted, the data stored in the volume remains encrypted. When you restart the computer or shut down the computer, the volume will be dismounted and all files stored in it will become inaccessible (and encrypted). Even if there is a sudden power interruption (without proper system shutdown), all files stored in the volume will remain inaccessible (and encrypted). To make them accessible again, you must mount the volume. To do this, repeat step 9.
If you want to dismount the volume:
If you want to close the volume and make the files stored in it inaccessible, restart the operating system or dismount the volume. To dismount the volume, follow these steps:
1. Open the main VeraCrypt window.
2. In the list of mounted volumes, select the volume you want to dismount.
3. Click the Dismount button at the bottom of the window.
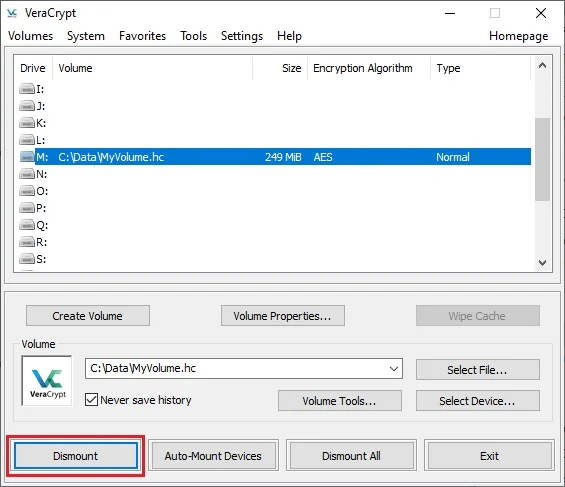
The volume will be dismounted and the files stored in it will become inaccessible until the volume is mounted again.
Conclusion
VeraCrypt is an excellent tool for those seeking robust and flexible data security. It offers the ability to encrypt entire disks or create encrypted containers, ensuring that your data is protected from unauthorized access. Additionally, its user-friendly interface allows less experienced users to use strong encryption without the need for deep technical knowledge. As open-source software, it is reviewed by a large security community, which increases confidence in its integrity and resistance to vulnerabilities.
If you store files in the cloud, an equally powerful alternative is Cryptomator. While VeraCrypt is ideal for protecting disks and local volumes, Cryptomator was specifically designed to protect data stored in cloud services like Google Drive or Dropbox. It encrypts your files before they are even uploaded to the cloud, ensuring that your data is protected, even if the cloud storage provider suffers a security breach.

Prof. Uirá Ribeiro
Chair do Board do Linux Professional Institute
After years of watching professionals waste hours on simple tasks because they didn't know the right Linux tools, I decided to teach.
Today I'm the author of most of LPI's official Learning Materials and mentor to over 14,000 certified students.
That was just one piece. The course teaches the whole path — from your first command to exam day.